
For a few months, Todd has been quite busy with the beginnings of our masonry heater. (If you remember, we have heated our home for two winters with radiant floor heat fueled by propane.) That is actually our backup system; it has always been our intent to construct a wood-fueled heater in the center of our home.
If you visited Terra Dei at Lutherlyn, you'll remember the masonry heater constructed between the living and bedroom spaces. Haven's new heater will be based on the same Finnish Fireplace design, described by Albie Barden of Maine Wood Heat in his construction manual from 1984.
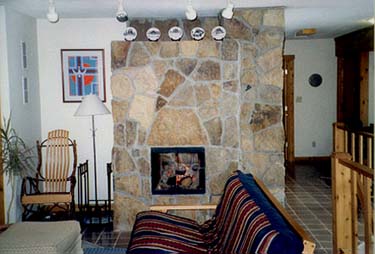
(Terra Dei living space circa 1998, featuring our beautiful masonry heater.)
So...why a masonry heater? Why not a plain old "woodburner"?
If you picture a typical woodburning stove or traditional fireplace/chimney, you build your fire in the firebox. It burns---giving off some heat to the room---but quite a bit of the energy goes straight up the chimney and is lost.
In the design history section of his book, Albie describes the Finnish contraflow design that was invented in 1850 by a Swedish engineer by the name of Wimanin.
At the risk of oversimplifying, here's the gist of the design:
1. You build the fire in the firebox and close the doors. The fire burns in the main chamber.
2. Instead of going straight up and out the chimney, the superheated gas travels through a maze-like tunnel built out of firebrick inside the heater.
3. The firebrick absorbs the heat and radiates it outward over the next 12-24 hours.
When Todd and I lived at Terra Dei, that translated into two fires a day---one before leaving for work, one upon return---to heat our entire home. You're talking about an incredibly efficient system, which saves precious resources and translates into huge cost savings for the homeowner.
I'll share our final cost once we've completed construction.
(If you have technical questions, leave them in a comment. I'll have Todd address any details.)
In the meantime, here we go!

(Lutherlyn friends---this heater base is comprised of block salvaged at camp. I have remnants of Cabin 19 and the old Dining Hall in my basement!) So far, our cost has been minimal---about $18 for a chimney cleanout door and another $20 for mortar.
Remember where we had the craft table? (Right above the purple tempera splotch on the floor!)

Once you lift up the concrete board, we had many pieces of plywood and subfloor.

Juli and Micah were both excited about revealing the hole in the floor, so they were anxious to help Daddy with his tools.


And at my request, Todd kid-proofed the hole in the floor to keep kids safe during this point in construction.
(Note, the cat did disappear beneath the floor for a few minutes the other night. Lucky for all of us, she decided to resurface quickly.)

To be continued!