Tuesday, December 6, 2011

Through the Ceiling

Exciting stuff happening around here!
As of Saturday morning, we approached going through the second story with the chimney pipe.


Which meant a hole needed to be cut from the attic above.


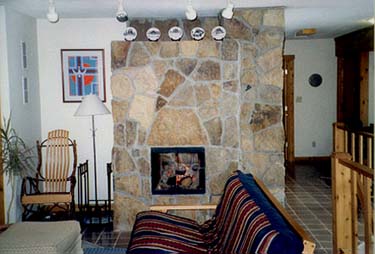
Eventually this stainless pipe needs to be finished off on the outside with brick or stone for aesthetic reasons.  (We chose stone.)  However, you can't mortar stone to a stainless pipe and have it turn out well.  (At least we can't.)  Todd's brainstorm was to put terracotta chimney liners around the pipe, an easier surface to cover with stone.

The only thing was, the pipe was already in place inside one liner, which meant three liners had to be dropped into place from above.  We don't have any pictures of that adventure.  It required three people, two ladders, and a length of climbing webbing.  Todd was in the attic; my father and I were down under the hole.

The webbing was my idea.
It made me nervous to have my husband hand these down through the hole in the second-story ceiling, because each liner weighs about eight million pounds.  (Todd's estimate is 60-70 pounds apiece.)
So I asked him to thread a length of webbing down around the bottom of each liner so he could lower each one down.  That would slow its progress as it descended towards my head.
He acquiesced, and I felt a bit safer while we worked.
My dad was the one to bear most of the weight as each liner came down.
I was there to handle a tiny bit of weight and say very helpful things.
Half an hour and three tiles later, we were done.


Stone, stone, and more stone.


I had to include this last picture, even though it's not great.  It's just so rare for anyone to take a picture of me.  So when Todd said, "Hold that there.  Do you want me to take a picture of you so it looks like you were helping?"

I said, "Absolutely!  Thanks!!!"

Monday, November 21, 2011

The Next Right Thing

He comes home from work.  In the few minutes we have before dinner is on the table, he's out there with the stone and the saw, making just. one. more. cut.


His determination is what has seen us through on so many projects.  
He simply never gives up.


Tonight, that means the top stone on the left side and the piece at the top left of the oven door.

In a much bigger sense, it's what holds us together.
Steady, unchanging, dependable.
Doing the next right thing.  Every time.

* * * * * * *

#5...two part-time jobs that I love, neither of which require me to work on Monday
#6...the pleasure of getting to know a new friend
#7...wild turkey grazing through the woods
#8...a child eager to study and work on projects
#9...Micah's still-small boy frame leaning on mine to watch Veggie Tales

Saturday, November 19, 2011

And yet more stone!

Two more pictures, to show what Todd accomplished in the afternoon:


Set in Stone

We have Todd's brother, Tim, to thank for the outer stone for our fireplace.

A few years back, Tim replaced a stone walkway with poured concrete.  He and Todd loaded up the giant pathway stones with the intent of using them as the outer stone layer on our masonry heater.  (It was another one of those times when I was glad I was the girl, and no one would expect me to try and lift any of those monstrous pieces.)


The yellow rope is just a temporary safeguard, should the mortar decide to let go while drying.  (I'm not actually sure it would have any chance of holding the stone in place should it decide to let go, but it makes us feel better.)


We've been surprised how relatively easy these stones are to cut.
I've said it before, but it bears repeating:  it amazes me that Todd is able to visually plan all of this and have it turn out just the way it needs to.  It's a good thing that it's not my job.


We're getting closer and closer to that first fire.  It's time to start learning how to use the stone oven.  I can smell the pizza baking already!

Saturday, November 5, 2011

Wirlwhind

My wonderful husband let me sleep in this morning while he got up with earlybird Micah.  
After breakfast, the real fun started.
We went through the ceiling today with the fireplace!
(And by "we", of course, I mean Todd.  He did the hard work.  I vacuumed up a little dust, uploaded pictures to the computer, and struggled through a maze of information online to choose a new cell phone plan.)


Micah was right there (in his Batman jammies) to hold the shop-vac hose and suck up little bits of drywall dust.


An oddly-placed bench in the upstairs hall, to keep small children from falling into the chimney flue tile.


I can feel the heat from the fireplace already.  Not too much longer!

Monday, October 17, 2011

The Heat is On!

Okay, not really.  Our house is staying a comfortable 67 degrees, even with recent cooler days.  No need to turn the heat on yet!

With winter weather approaching Todd has been spending every spare moment on the fireplace.  But true to form, he's not so busy that he can't take a few moments to let Micah help.


We're so close!  The interior masonry is done.  Todd has put a felt-like layer between the yellow fire brick and the outer red brick to allow for thermal expansion and contraction.  Once he brings the common red brick all the way up, it will be time to haul the stone in for the outermost layer.


One of the things I admire so much is Todd's ability to read written instructions and turn them into something tangible.  It is a true gift---one that that will pay off in dividends of heat this winter!

Sunday, July 3, 2011

Our Finnish Fireplace...that will soon be finished!

For a few months, Todd has been quite busy with the beginnings of our masonry heater.  (If you remember, we have heated our home for two winters with radiant floor heat fueled by propane.)  That is actually our backup system; it has always been our intent to construct a wood-fueled heater in the center of our home.

If you visited Terra Dei at Lutherlyn, you'll remember the masonry heater constructed between the living and bedroom spaces.  Haven's new heater will be based on the same Finnish Fireplace design, described by Albie Barden of Maine Wood Heat in his construction manual from 1984.

Masonry Heater
(Terra Dei living space circa 1998, featuring our beautiful masonry heater.)

So...why a masonry heater?  Why not a plain old "woodburner"?

If you picture a typical woodburning stove or traditional fireplace/chimney, you build your fire in the firebox.  It burns---giving off some heat to the room---but quite a bit of the energy goes straight up the chimney and is lost.  

In the design history section of his book, Albie describes the Finnish contraflow design that was invented in 1850 by a Swedish engineer by the name of Wimanin.  

At the risk of oversimplifying, here's the gist of the design:  
1.  You build the fire in the firebox and close the doors.  The fire burns in the main chamber.  
2.  Instead of going straight up and out the chimney, the superheated gas travels through a maze-like tunnel built out of firebrick inside the heater. 
3.   The firebrick absorbs the heat and radiates it outward over the next 12-24 hours.

When Todd and I lived at Terra Dei, that translated into two fires a day---one before leaving for work, one upon return---to heat our entire home.  You're talking about an incredibly efficient system, which saves precious resources and translates into huge cost savings for the homeowner.  

I'll share our final cost once we've completed construction.  
(If you have technical questions, leave them in a comment.  I'll have Todd address any details.)

In the meantime, here we go!


(Lutherlyn friends---this heater base is comprised of block salvaged at camp.  I have remnants of Cabin 19 and the old Dining Hall in my basement!)  So far, our cost has been minimal---about $18 for a chimney cleanout door and another $20 for mortar.

Remember where we had the craft table?  (Right above the purple tempera splotch on the floor!)

Once you lift up the concrete board, we had many pieces of plywood and subfloor.


Juli and Micah were both excited about revealing the hole in the floor, so they were anxious to help Daddy with his tools.


And at my request, Todd kid-proofed the hole in the floor to keep kids safe during this point in construction.
(Note, the cat did disappear beneath the floor for a few minutes the other night.  Lucky for all of us, she decided to resurface quickly.)


To be continued!